Did you know the first 5 seconds of a web page’s load time have the highest impact on conversion rates? 1 Additionally, the conversion rates drop by about 4.42% for each additional second of load time. In web jargon, a conversion rate is just the percentage of visitors on your website that take a desired action. For example, if you run an eCommerce shop, this may be purchasing a product. If your website has a booking system, you might want the visitor to make a booking or reservation. There are a few steps you can take today to optimize your website’s speed and decrease load time, let’s take a look at some of these steps.
Run A Speed Test
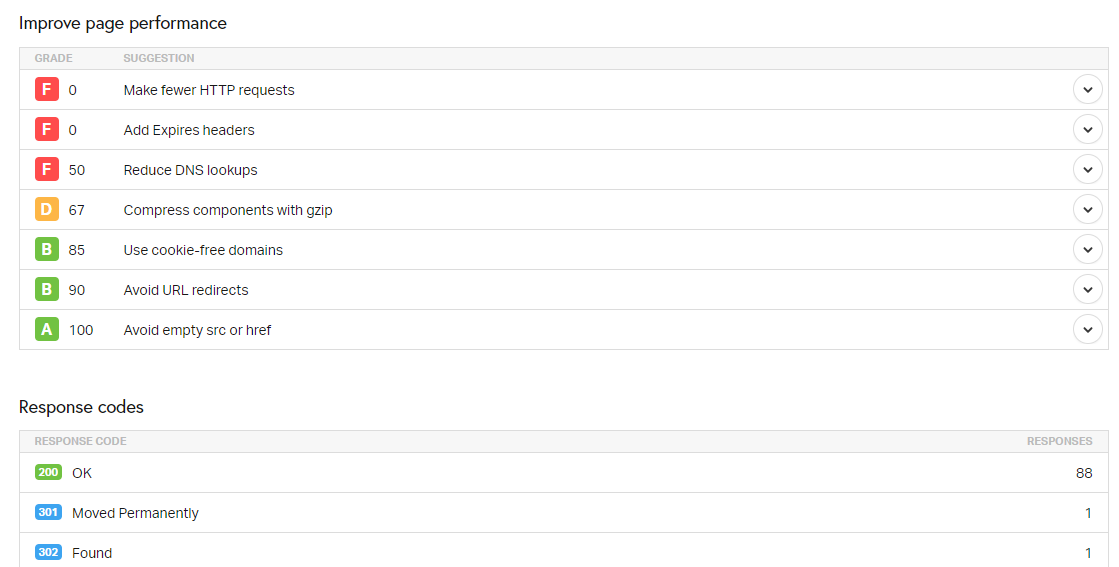
The quickest way to find out what is causing your website to load slowly is to run a speed test. Running a speed test on your website will show you a detailed rundown on issues that will slow down your website. Some common speeds test include Pingdom, GTMetrix, WebPageTest, and Google PageSpeed Insights.
Common items that may affect your page speed include Expires headers, compression, and file sizes – which we will take a look at below.
Use A Content Delivery Network
A content delivery network (CDN) speeds up your website by working in tandem with your hosting to store a static cached copy of your website on servers all around the globe. When accessing your website, the user is automatically connected to the nearest server to their physical location. Content delivery networks also cache your content including images and videos. With conventional hosting, if a user across the world tries to access your website they will always load your website from the primary server which has a static location, whereas with a content delivery network the servers that your website is served from are located worldwide. We offer a content delivery network that is included with BlackShield (powered by Sucuri’s global network).

Enable GZIP Compression
Gzip is a file format used for compressing and decompressing files and folders. Gzip allows for static files such as HTML, CSS, and Javascript to be made smaller, therefore, reducing network transfer speeds. If you are a shared hosting customer, you can easily enable Gzip via your cPanel interface. To enable Gzip compression on your account follow these steps:
- Login to your cPanel account. Your cPanel is located at https://example.com/cpanel, where example.com is replaced with your domain.
- Scroll down to the Software section and click on Optimize Website

- Click on “Compress All Content”

- Click “Update Settings”
Optimize Your Images
If you are not including images in your website, you should be. Psychologist Jerome Bruner found in a study that people remember 10% of what they hear, 20% of what they read, and about 80% of what they see and do. In other words, if you want people to remember your website – images should play a big part in your website content. When you have lots of images on your website, however, load times can suffer. This is why it is important to optimize your images.
Image Optimization is the process of saving and distributing images in the smallest possible file size, without reducing the overall quality of the image. While this may sound complex, it is actually quite easy to do and can have a huge impact on your website’s load times. The three steps of optimizing your images are as follows:
- Image Compression
- File Format (i.e. JPG or PNG)
- Dimensions & Resolution of your images
Let’s take a look at these in more detail:
1. Compression
Image compression is a big factor in image optimization, when you are compressing your image you are reducing the size of your images. Doing so will reduce the time it takes for the web browser to download the images. There are many tools for compressing images that make it easy for you as a webmaster. You can use tools like TinyJPG or TinyPNG to compress images directly in your web browser, or you can use image-editing software like Adobe Photoshop or GIMP if you are a more advanced user.
If you are a WordPress user and prefer to use a plugin for compressing your images, you can use a plugin such a WP Smush or ShortPixel to compress your images automatically.
2. File Format
For most websites, the two main file formats that will matter are JPEG, PNG. But which one should you use? Let’s take a look:
JPEG is a compressed file format, whereas PNG is an uncompressed file format. JPEGS are more often than not used for displaying complex photographs with lots of colors in them. Here is an example of a JPEG image:

PNGs are just as popular as JPEG for website use. The main difference is that PNG’s are uncompressed – which means you’ll want to use them for images that contain fewer colors as it can cause large file sizes when using the PNG file format. Some common use cases for PNG files are logos and icons.
3. Dimensions & Resolution
Typically, if you are importing a photo from a camera or cellphone, the image file will have large dimensions and a high resolution. More often than not they will have a resolution of 300 DPI and a dimension of 2000 pixels and higher along with a large file size – which can be 1MB or higher. When it comes to websites, high-quality photos are not the best option. To reduce the dimensions of the image you can simply resize the image using one of the photo editing programs mentioned above, or if you prefer to do it on the web you can use Adobe Photoshop Express. For WordPress users, there are plugins that automate the resizing of images such as Imsanity.
Minify & Combine Your Files
HTML, CSS, and Javascript files are extremely important to your website’s functionality, as they determine what your website looks like and how it functions for the user. Minifying is the process of reducing your file size while still keeping your code functional by removing extra white space, line breaks and indentation. Let’s take a look at what minifying your code does.
As an example, here is some basic CSS:
body {margin: 0;padding: 0;color: black;background: #eee;}
p {font-size: 13px;color: #d3d3d3;padding: 20px;}
Here is what it looks like when it has been minified.
body{margin:0;padding:0;color:#000;background:#eee}p{font-size:13px;color:#d3d3d3;padding:20px}
To minify your CSS, HTML, and Javascript you can use a tool like Minifier to do it directly in the browser. If you’re using WordPress — the minifying process is automated for you via a plugin like Fast Velocity Minify.
Add Expires Headers
Adding expires headers is one of the most commonly recommended additions that you can make to boost webpage speeds. What exactly does it mean to “add expires header”, though? Let’s take a look.
What Are Expires Headers?
Expires headers are instructions that tell the web browser whether they should request a file from the server, or use what they have in the browser cache. Expires headers are used to not only reduce the number of downloads requested from the server, but also to reduce the number of HTTP requests that are made to the server.
The best practice for expires headers is to set a late expiry time for static content on your website that does not change to avoid having the user’s browser download the content every time they access your website.
Why Is It Important?
Adding Expires Headers to your website reduces the number of HTTP requests, in turn reducing the time it takes for the server and the browser to communicate with each other. Moreover, this decreases load times for the end-user and decreases the amount of stress that your website’s hosting resources are put under.
How Can I Add Expires Headers?
First, you’ll need to login into your cPanel account. Your cPanel is located at https://example.com/cpanel, where example.com is replaced with your domain.
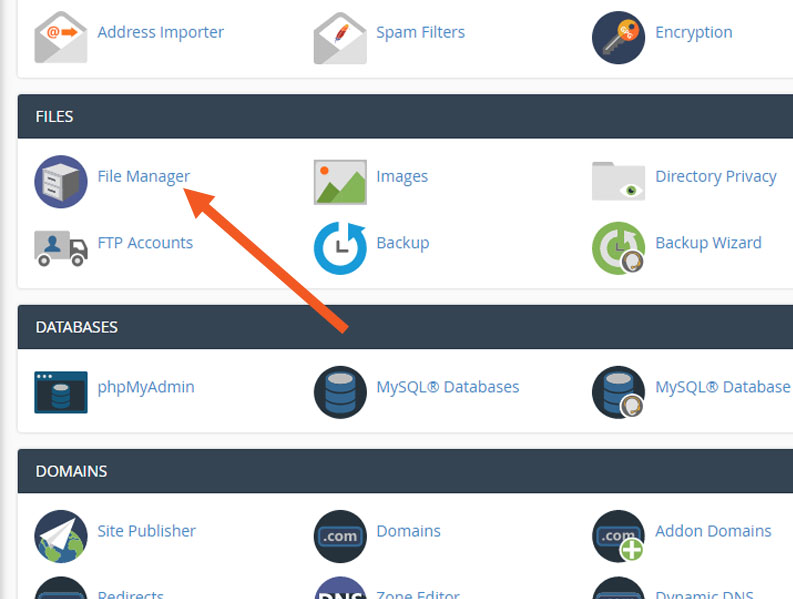
Once you’re logged in to your cPanel, click on “File Manager”
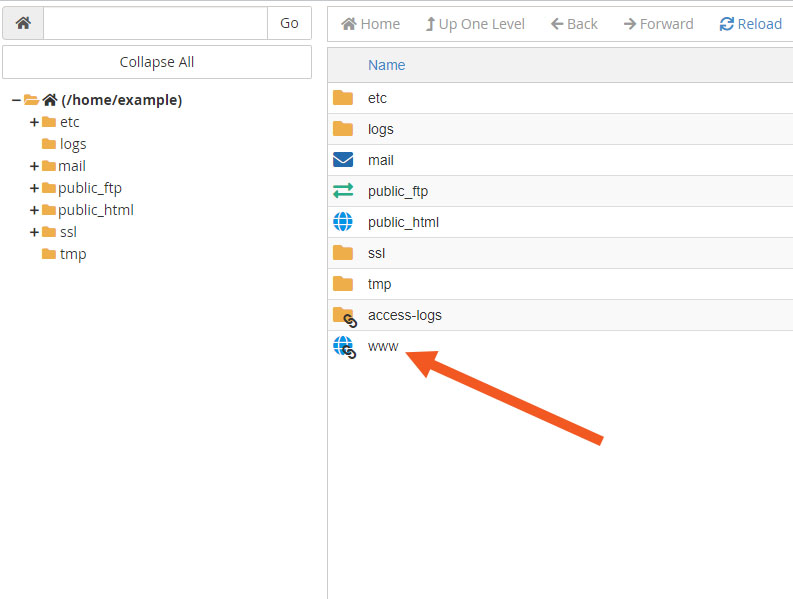
In your file manager, click on www, or if you have a different root for your files (i.e. a subdomain) you’ll want to click on that.
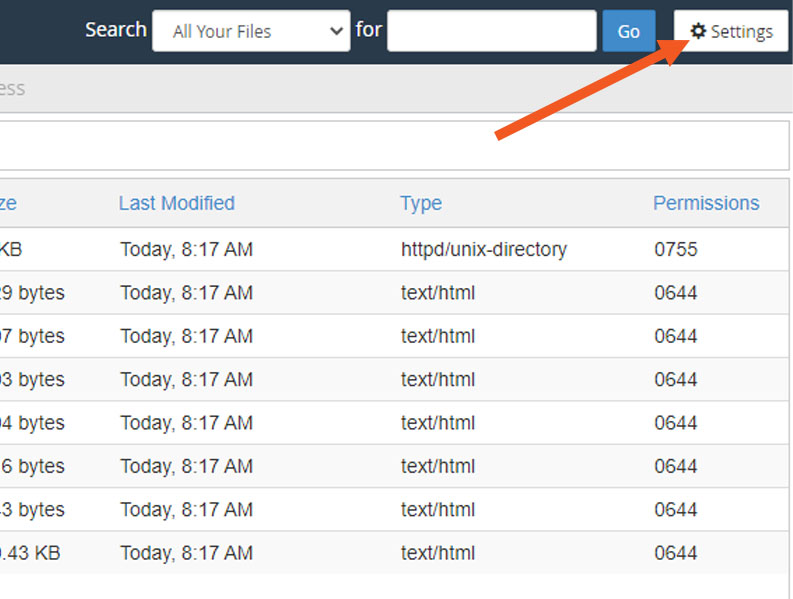
Once you’re in your website’s root directory, you’ll want to click on settings and check the “Show Hidden Files (dotfiles)” checkbox, then click Save. This will allow you to see your .htaccess file.
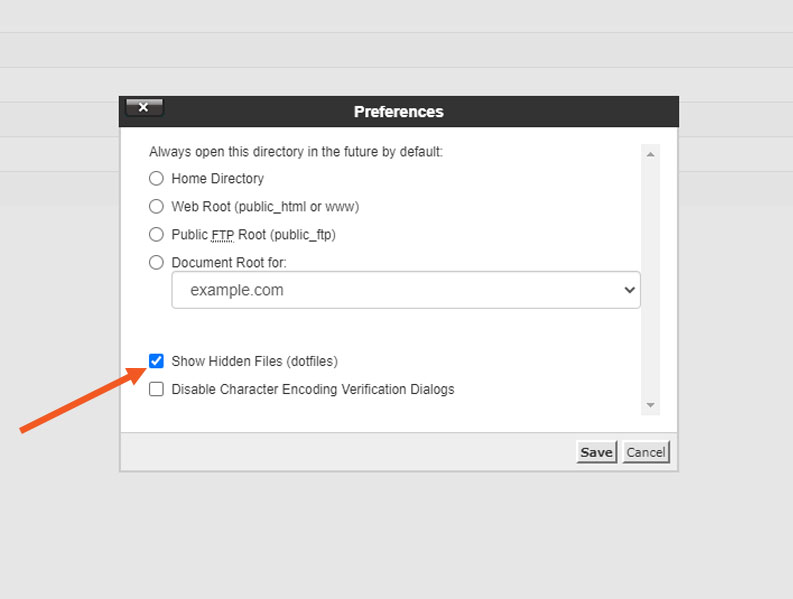
Edit your .htaccess file, and copy and paste the following code into it. Once you have pasted it, go ahead and save the file.
<IfModule mod_expires.c>
ExpiresActive On
# Images
ExpiresByType image/jpeg “access plus 1 year”
ExpiresByType image/gif “access plus 1 year”
ExpiresByType image/png “access plus 1 year”
ExpiresByType image/webp “access plus 1 year”
ExpiresByType image/svg+xml “access plus 1 year”
ExpiresByType image/x-icon “access plus 1 year”
# Video
ExpiresByType video/mp4 “access plus 1 year”
ExpiresByType video/mpeg “access plus 1 year”
# CSS, JavaScript
ExpiresByType text/css “access plus 1 month”
ExpiresByType text/javascript “access plus 1 month”
ExpiresByType application/javascript “access plus 1 month”
# Others
ExpiresByType application/pdf “access plus 1 month”
ExpiresByType application/x-shockwave-flash “access plus 1 month”
</IfModule>
Additionally, if you are a WordPress user, you can use a plugin like Hummingbird to optimize your site speed and add Expires Headers.
Choose A Good Host
Choosing a good host is crucial to improving web page speeds. Server response time has a significant effect on your overall website speed. Here at BlackSun, we are serious about speed — with 20Gbps+ network bandwidth, Intel® Xeon® Gold 6230 processors and AI driven SSD based storage — you can’t go wrong. Check out our shared hosting plans here.
